How to Get Fluffy Eyebrows *Even If You Don’t Have Full Brows*
Lifted, soft, fuller-looking.
As much as I admire the perfectly defined, meticulously plucked, and arched brow look, I’ve been fully converted to bushy, fluffy eyebrows. It’s more youthful, works with literally any makeup style, and just feels fresher.
The fluffy brow trend hasn’t taken over your social feed for no reason. It’s that sweet spot between structured and natural: full, lifted, a little wild, but still polished.
Unlike the stiff, over-sculpted, overly tinted “YouTube tutorial brow” of 2016, the fluffy brow is more French model casually strolling through a farmer’s market.
And of course, it’s supposed to look effortless, but somehow still takes effort. Typical. But don’t fret. Even if you weren’t blessed with naturally thick caterpillars, here’s your step-by-step guide to getting soft, feathery, gloriously fluffy brows.
Quick Tip: Before we begin, I want to quickly mention a few tips and tricks I believe that will save you a lot of time! First off, make sure there’s no makeup or skincare residue on or around the brows. Things get messy when brow products mix with what you already have there. So start with clean brows, and if you have some free time on your hands, consider using an exfoliating pad/toner on the brow area to clean up and prevent flakes.
How To Get Fluffy Eyebrows
1. Tame Your Brows Without Over-Plucking
First things first: you’re not trying to draw on a whole new set of brows. You’re enhancing what you’ve got. So shape your brows and trim the edges, but use tweezers sparingly.
Fluffy brows thrive on a bit of chaos, and excess plucking/trimming can kill volume. So don’t try to clean up everything. Don’t go plucking around the arch or tail too much. Only remove the hairs that are clearly outside your brow line.
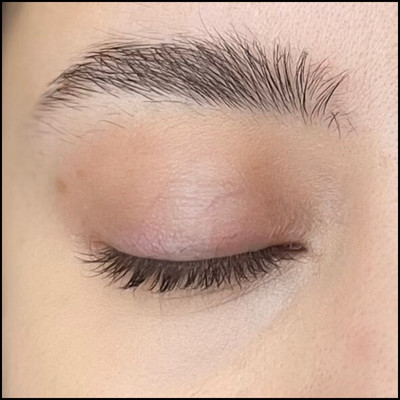
This is my sister’s natural brow situation before I touched anything. No trimming, no plucking, no product. Just raw, untouched eyebrows with a few stray hairs doing their own thing.
2. Brush Upwards to Reveal the Shape
Use a clean spoolie to brush your brows against the grain and then up. Brushing backward adds a nice fluff and volume. Keep combing your eyebrows upward and outward to reveal the sparse areas that need filling in.
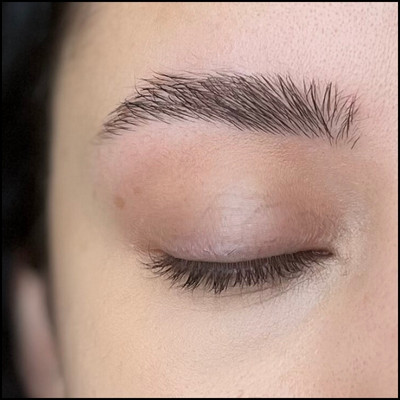
This is after some light grooming. I only removed hairs that were too far outside her natural brow shape and trimmed the top edges. Already looks more lifted and clean without overdoing it. I didn’t trim the mid or the tail section because it’d look too neat.
3. Define the Edges
Use a fine-tip brow pencil or brow pen to trace a soft outline along the bottom edge of your brow. You’re not trying to create a new shape, just gently define what’s already there.
If your tail is a little short, elongate it subtly with your pencil. Avoid making the front of your brows (near the nose) too boxy or sharp. That can give you an angry look.
4. Fill in Sparse Areas
Now that you’ve brushed your brows up and outlined, you can see sparse areas. Liquid brow pencils are the best products to fill in these gaps because they imitate natural hair, helping you fake wispy brows.
Use a light hand and use your brow pencil to create light, upward strokes where you see gaps. Mimic the direction of your natural brow hairs. Focus especially on the tail and middle of the brow. Comb your brows again, and keep drawing on fine hair strokes until you’re happy with how things look.
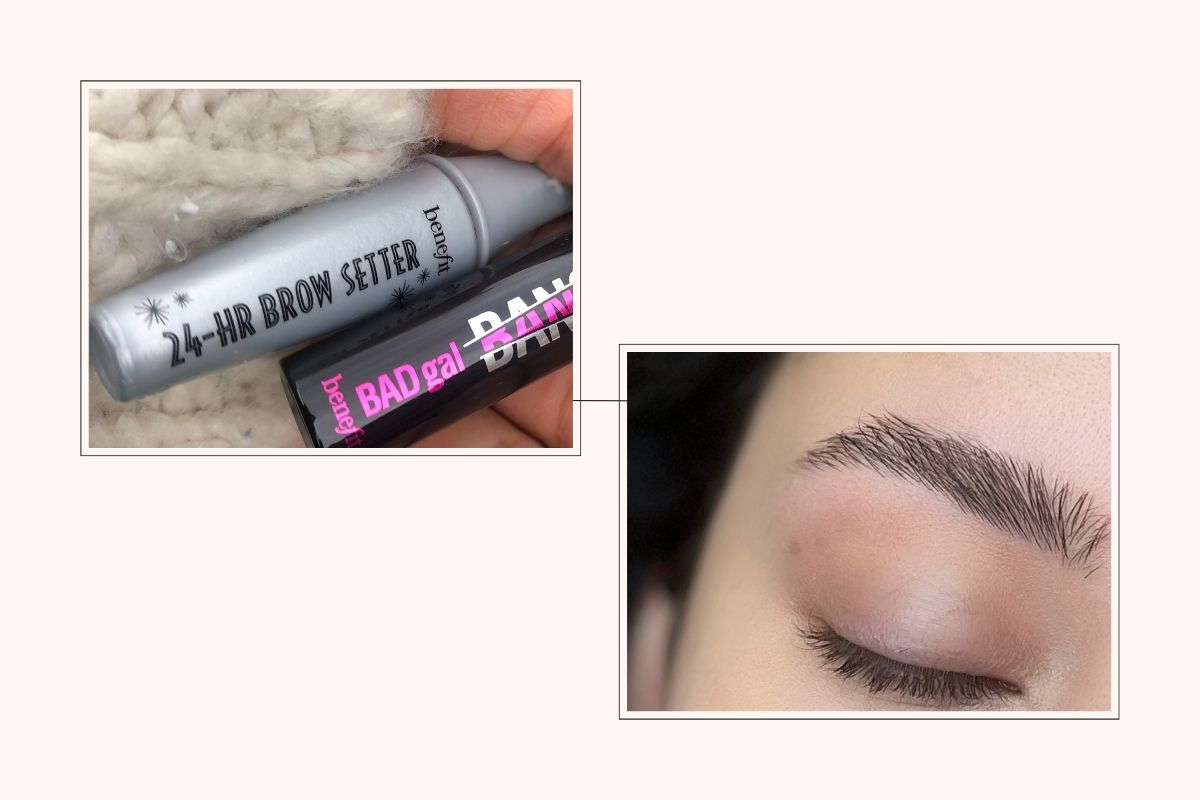
5. Set the Eyebrows in Place
Use a clear brow gel to set your brows in place and create feathery, subtly wet, fluffy eyebrows. This will also help keep your brows in place and hold longer.
If you need more definition, use a tinted brow gel instead. These types of brow gels are usually made with fibers to add volume to eyebrows, helping you achieve fuller, thicker brows. Keep applying the gel in an upward motion until you achieve the desired effect.
On a side note, sometimes the clear brow gel makes the tint of the pomade/pencil inside the brows move, causing a dark shadow above the brows. Dip a Q-tip into micellar water and go over the area to clean things up.
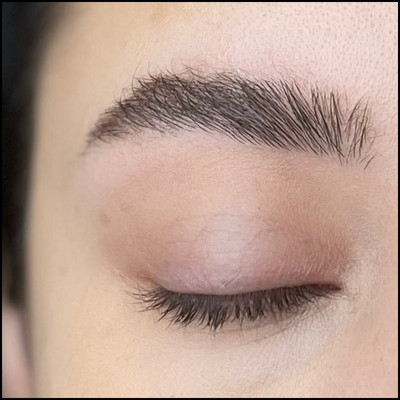
This is after lightly filling in sparse areas with a tiny bit of brow pomade, setting everything with a clear brow gel, and brushing up with a spoolie for the fluffy lift. My sister doesn’t naturally have super full brows, but as you can see, the technique still works!
6. Clean Up with Concealer
This step makes everything look sharper without over-sculpting. Apply a dab of concealer under your brow and blend it well. This gives a subtle lift and brightens the eye area. It also adds contrast that makes your brows pop without darkening them.
If you want even more lift and glow, tap a tiny bit of highlighter right on the brow bone. It catches the light beautifully, especially with dewy makeup.
So this is how you get fluffy eyebrows. It’s all about soft definition and creating a feathery look. The best thing about a fluffy brow look is that it’s low maintenance. So don’t shy away from trying it while creating your favorite looks.
One last thing: some brow gels, especially the heavy-duty ones, are a nightmare to remove. Go in with micellar water or an oil cleanser to double cleanse, and be gentle. They take forever to grow back, and we both know it.
If you want to keep the fluffy going long-term, start brushing your brows up daily, even when you’re not wearing makeup. It helps train the hairs to stay lifted.
And if you’re serious about growth, consider adding a brow serum to your routine. Basically: treat them well, and they’ll fluff up for you.
Read Next: Mascara Cocktailing