How To Apply Blush Perfectly Every Single Time
Placement changes everything.
Apply your blush like this and people will think you’re shy & flirty.
Anyone who knows me knows my love for makeup that makes people look. That’s why I love blush as it takes very little effort to turn heads when you’re wearing pink! But for the life of me, I never understood why this makeup product was not being properly utilized. That is until a close friend reminded me that not everyone has 30 years of practice with it!
I was able to teach my friend a couple of tricks so that she could make peace with blush and enjoy wearing it. But I realized that wearing something pink or red on your face can be quite intimidating! That’s why I decided to dive into how to apply blush so that it makes you want to wear it more often too!
As a cheek makeup product, blush is supposed to give your face a rosy, flushed look. It’s meant to mimic the color of your own cheeks. And it can turn basic makeup into a youthful, vibrant one. Matte or glowy, gel or powdery, it has this undeniable effect that transforms something as artificial as makeup into something real like rosy, flushed cheeks.
Of course, that is when you apply it correctly. And knowing how to apply blush is not just knowing where the apples of your cheeks are. It also has a lot to do with proper application, formula, shades, and so much more. So if you think you’re doing something wrong when applying blush, one of these aspects could be the culprit.
To that end, below is everything you need to know to master the art of applying blush.
How To Apply Blush
1. Finish Your Makeup First
First of all, know that blush is usually the last step of your face makeup. You apply it after you’ve applied foundation and bronzer.
It’s because of the fact that blush has this hard-to-miss color like pink and red. And it can look over the top if you’ve already used too much of other cheek products like bronzer.
So finish your skincare routine, then finish your face makeup, and only then move on to blush application. If you’re new to makeup, take a look at our guide to the correct order to apply makeup products.
2. Use a Blush Shade That Suits Your Skin Tone
Trust me when I say that the perfect blush shade is the one that complements your skin tone and not the one that makes you look like you’ve been standing upside down.
The right blush shade is supposed to complement your skin tone and undertone so that it looks natural. If it doesn’t, it’s the problem, not you!
I have rosacea, which gives me naturally red cheeks, and even I can wear blush with rosacea! So there’s a shade for every skin tone! Here’s how to find the perfect blush shade for you.
Identify your skin tone first as in fair, medium, or deep. In general, people with fair and light skin tones could benefit from soft pinks, corals, and peach blushes.
For people with medium skin tones, warmer shades such as berries or apricots work really well. And for people with darker skin tones, you can try higher impact colors such as deep plum or deep berry.
3. Choose the Right Blush Type
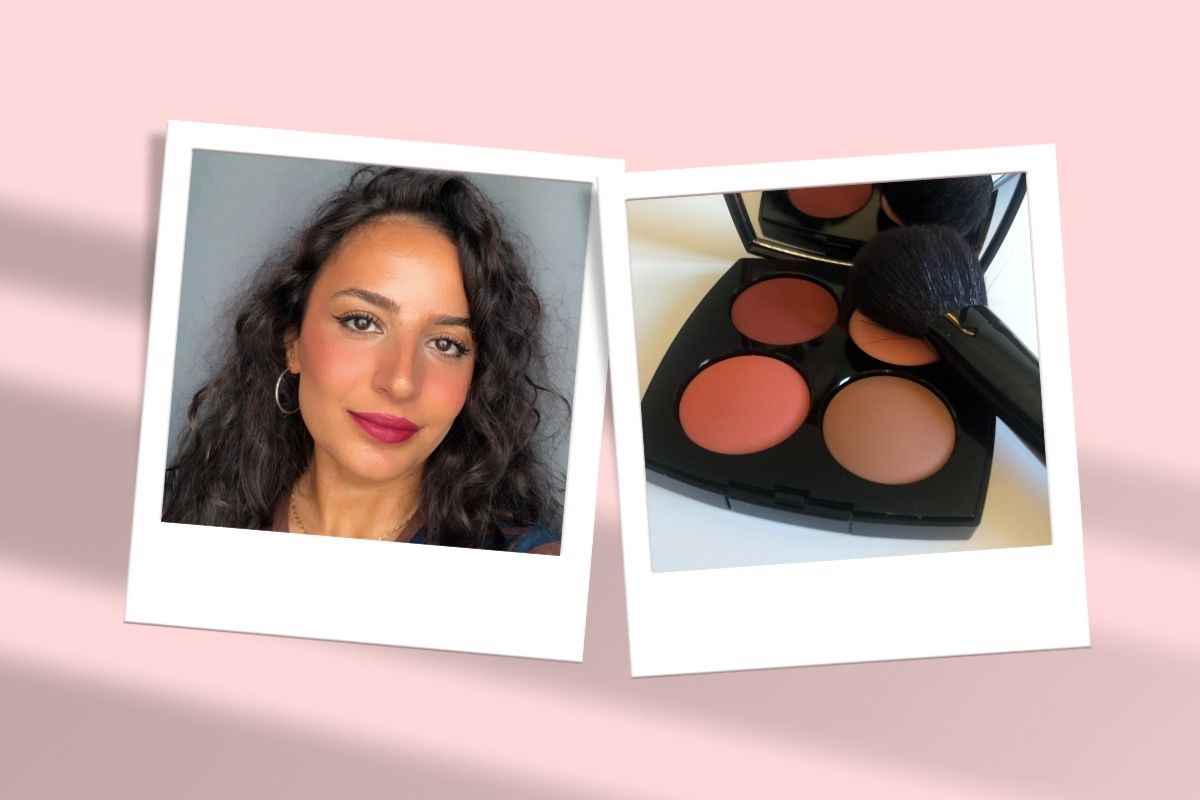
Though most of us think of a compact powder when we think of blush, there are actually different types of blush. The most common of them are powder, cream, and liquid blush.
While this choice is all up to you, it doesn’t hurt to know what each of them does. That way, you can find the one that’s more flattering or convenient for you.
A powder blush is the mainstream type of blush that comes in a compact pressed powder form. This type has the widest shade range. You can try powder blush no matter your skin type, tone, or texture.
Stick with powder blushes if you’re new to blushing or you can’t really afford to experiment. If you’re looking for something that looks more natural, try cream blushes or stick blushes, which usually apply like cream too.
They’re easier to blend and perfect for no-makeup makeup looks too. Because of their creamy texture, they’re suitable for people with dry skin and mature skin.
If you want something longer-lasting, or something that’s resistant to elements like wind or hot weather, try cheek tints. They stay on the skin much, much longer without fading.
4. Pick the Right Tool to Apply Blush
What you use to apply your blush can have an effect on your finished look. You can apply your blush with a blush brush, a beauty blender, and depending on the choice of your blush, your fingers.
Using a brush is usually the best way to apply blush for most people. A fluffy brush will allow you to apply blush and layer colors gradually, which is a beginner-friendly way to do it. They’re better for applying powder blushes.
A denser brush will give you a more precise application with more color payoff. But that’s not always a good idea, especially if you’re a beginner and you tend to overdo it. But these types of brushes work better for cream blushes and blush sticks.
You can also try applying blush with a beauty blender, which gives you more control and allows you to fix any mistakes easily. Sponges work well for all types of blushes so they’re the foolproof tools.
5. Consider Different Blush Finishes
A blush can have different finishes. There are matte blushes and shimmer blushes and even though there’s no right or wrong choice, here’s what you can expect from them.
A matte blush will be more versatile to use and works on any kind of makeup look. It’ll work on natural makeup as well as full glam makeup. You can use a matte blush for soft contour too.
A shimmery blush, on the other hand, gives your complexion a glow as if you’ve applied highlighter too. It has this exquisite rosy glow on the skin. But it’s difficult to use in summer because it can make you look greasy or sweaty.
Also, if you have textured skin or enlarged pores and you’re not taking good care of your skin, the shimmer can emphasize your skin texture, making those things more noticeable.
Both matte and shimmer blushes have their own place but you should consider the look you’re going for. In sum, you can always add shimmer to a matte blush but you can’t do it otherwise.
So either stick with matte blushes or make sure your shimmer blush is not too glittery and doesn’t look unnatural or heavy.
6. Consider Your Face Shape For Blush Placement
There’s a universal way to apply your blush if you prefer a no-muss no-fuss look. Look in the mirror and smile to locate the apples of your cheeks, which are the centers of your cheeks.
Starting from that point, sweep your blush upward towards your temples. Stay on your cheekbone’s natural curve and avoid moving above or below.
While this is the basic method for applying blush, you can try being more purposeful with it by keeping your face shape in mind so that your blush complements your face too.
Most makeup artists recommend keeping your blush on the high parts of your cheekbones if you have a round or oval face shape. If you have a square face shape, you can soften the look of it by focusing on the apples of the cheeks.
In general, curvy facial features like a heart-shaped face, oval face, or diamond-shaped face, require you to keep the blush up and above the high points of the cheeks to create a more lifted, fresh appearance.
7. Blend Slowly
The trick with blending your blush is to blend it into the skin as opposed to swirling it across your face. It’s because when you apply your blush, you bring out the color with every swirl and twirl.
The application itself intensifies the color. So you really need to get a small amount of the product and blend it slowly without moving around too much.
Otherwise, you’ll drag your blush color downward, which can make your makeup look unnatural. Or you can bring it too close to the center of the face, which can emphasize smile lines.
8. Try Layering Your Blush
Blush layering is when you layer two different blushes. In general, blush layering consists of applying a cream blush first and then applying a powder blush on top.
The advantage of this method is that it sets your blush in place and makes the pigments stay on the skin for longer. But there are other advantages too.
For example, try two different blushes with different finishes. You can apply a slightly dewy finish cream blush first and top it off with a matte one. This way, you have that glowy look peeking through, creating a multi-dimensional effect.
You can also apply complementing shades together to create a gradient effect instead of using a single shade. These can be a fun way to experiment with blush and an effective way to make your blush stay in place all day.
9. Fix Any Mistakes
If you’ve accidentally overdone blush or you’ve applied it unevenly, no worries. You can fix any blush mistakes by using a clean sponge.
Dab the makeup sponge onto the areas where you’ve applied too much. You’ll see that the sponge picks up the excess product so you can get a softer, toned-down look.
You can also apply a bit of foundation/concealer on areas where you’ve applied too much blush. You’ll neutralize the area with your concealer or foundation.
10. Set Your Blush
Lastly, remember to set your blush, and your makeup, in place by using a setting spray. If you’ve layered different blushes, it’s very unlikely to fade.
But if you don’t want to leave anything to chance, get a makeup setting spray and set it in place for all-day, fade-proof rosy cheeks.
So this is how to apply your blush so that it looks good every single time. Again, it’s not just about placement but also about using the right type, the right finish, the right tools, and the blending technique. But here’s the thing.
Makeup is incredibly personal and that includes blush too. You don’t have to do exactly what others are doing. So never shy away from experimenting with different placements.
I mean, we think blush goes onto your cheeks. But have you seen the trends lately? People use it in all kinds of places, including the under-eye area, which shows you that there is not really a wrong way to do your makeup.
So try, try, and try some more until you’re comfortable with how it looks. It needs to make you feel better and nobody else.
Read Next: How to Make Your Blush Last Longer