This Is The Best Way To Apply Your Blush and It’s Super Beginner-Friendly
Easy, foolproof, always flattering.
Trust me when I say that using a Beautyblender is the best way to apply your blush if you want a natural-looking and super consistent makeup look. And I say this as a person who’s not a big fan of a beauty blender or makeup sponge. I think it’s overrated and it’s the most subtle and sneaky way of using up your foundation quickly. Yes, it makes your makeup look natural and everything but I feel like your products go to waste when you apply them with a beauty blender. So I was still waiting for that pricey Beautyblender to make it worth my money until I tried it to apply my blush.
And I’m pleased to say that I finally have a way to put that blender to good use! So if you’re not happy with how your blush looks, you might want to give this technique a try. And if you’re not sure how to do it properly, I’m here to share.
Normally, a blush brush is the go-to tool for applying your blush. But there are some downsides to that, especially if you’re a beginner. For example, you do a few swipes across the cheeks and unless you’re a pro, you really don’t know where to place your blush.
But when you apply your blush with a sponge, you have more control over it because you just pat the sponge onto the skin and you build the color one dot at a time as opposed to one long swipe at a time. Additionally, it’s easy to overdo it when you’re using a brush.
If you end up with a lot of pigment right from the beginning, using the same brush to blend the blush simply makes things worse. You can’t just flip the other side and erase that red color. With a sponge, on the other hand, you absolutely can. And it’s way easier to blur out the harsh edges and create a seamless look.
Plus, not all blush brushes pair well with different blush types like cream blush or liquid blush. But with a beauty blender, you can use your sponge to apply liquid blushes, cream blushes, and powder blushes too. And of course, using a sponge to apply blush is also beginner-friendly.
Moreover, using a beauty blender makes even more sense when you’re using a cream blush. Because some cream blushes can move your foundation when you apply them directly to your cheeks. And it’s difficult to get the blush from the stick, especially with synthetic bristles. But a sponge makes it super easy.
The point is that you really have no reason to not try this. Keep reading for a step-by-step guide on how to use your Beautyblender or makeup sponge to apply your blush.
How to Apply Blush with a Beauty Blender
Step 1: Damp Your Beautyblender
Get your clean Beautyblender and run it under the water. Then squeeze it until it’s damp. A dry sponge can create streaks and won’t be as easy to spread the product with.
A completely wet sponge, on the other hand, will absorb a lot of your blush and you’ll end up having to use more product.
Step 2: Dab Your Beautyblender Into the Blush
If you’re using a cream blush, pat the bigger side of the sponge onto the blush stick or blush pot. Using this side of the sponge will make it easier to blur things out later on.
If you’re using a powder blush, do the same thing and dab the sponge into the pan to pick up the blush. If you’re using a liquid blush like a cheek tint, you can apply the tint directly onto the cheeks and then blend.
Step 3: Apply the Blush
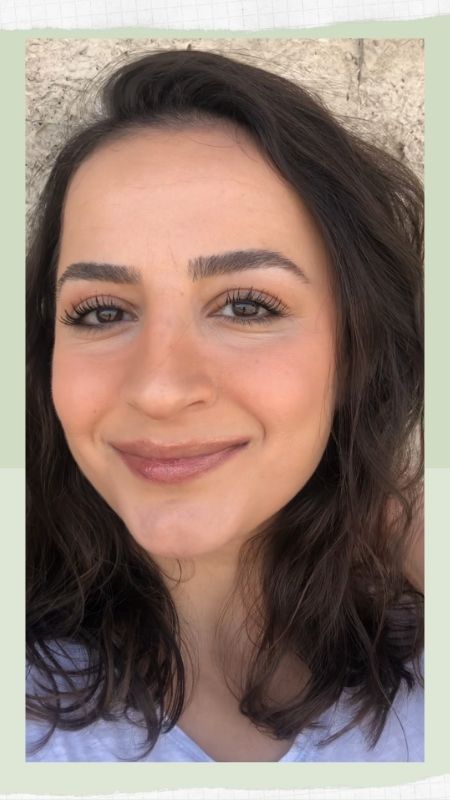
Using the bigger side of the beauty blender, gently bounce it on your skin starting from a little bit below the brow tail. Move onto the higher points of the cheeks and bring it toward the center.
At this point, you have a nice flush of color with the illusion of a lifted face. If you need more color, get some more blush and go over the same area until you’re happy with how it looks.
Step 4: Bring It to the Nose
This is optional. But I think this is the best way to apply your blush to create that sun-kissed look. And using your Beautyblender here makes it even better. Get some more blush and use the side of your Beautyblender to get it.
Then place that side of the sponge on the sides of the nose. And do a small dot on the bridge of the nose. Blend the blush a little toward to cheeks as if the color starts from the center of the nose and spreads out to the cheeks.
Usually, you do a swipe on the nose with a brush. But as your nose is right at the center of your face, it’s easy to overdo it and difficult to undo it.
Moreover, when you overdo this, it makes the concealer under your eyes pop, which ends up making you look like a clown.
But a sponge is basically the best tool for this blush placement. After you color up the sides of the nose, use the bigger side of the sponge to blend it in and soften the look.
Step 5: Correct Any Mistakes
You can correct any mistakes at any point while you’re applying your blush or you can do it after you’re done blushing. Just use any clean side of your damp Beautyblender and go over the harsh edges to create a seamless look. The clean side will absorb the pigments and you can tone things down as much as you like.
The best part about applying your blush with a Beautyblender is that you can just go over your whole face with your clean sponge to undo the whole thing. You don’t need to apply your foundation to correct your mistakes.
So this is how you can easily apply your cream/powder/liquid blush using your Beautyblender. Again, this is great for beginners too. I’m still on the fence about using sponges to apply foundation. But I’m all for using sponges to apply blush.
Read Next: How To Wear Blush When You Have Rosacea